


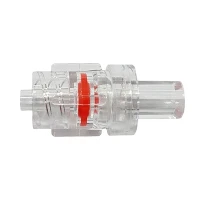


In the realm of medical and fluid - handling devices, the installation of rotating luer connectors can be a crucial step. As a supplier of Rotating Luer Connectors, I understand the intricacies involved and am here to share a detailed guide on how to properly install these connectors on a device.
Understanding Rotating Luer Connectors
Before we delve into the installation process, it's essential to have a clear understanding of what rotating luer connectors are. Rotating luer connectors are specialized components used in various devices, especially in medical applications such as syringes, IV sets, and other fluid - delivery systems. They are designed to provide a secure and leak - proof connection while allowing for rotation, which is extremely useful in situations where flexibility is required. You can learn more about Rotating Luer Connectors on our website.
There are two main types of luer connectors commonly used in combination: male and female. The Male Luer Lock Connector has a tapered tip with external threads, while the Female Luer Lock Connector has a corresponding tapered cavity with internal threads.
Materials Required
To install rotating luer connectors on a device, you will need the following materials:
- Rotating Luer Connectors: Make sure you have the correct type and size of connectors for your device. Different applications may require specific connector configurations.
- Device: The equipment on which you will install the connectors. This could be a syringe, a tubing system, or any other relevant device.
- Cleaning Supplies: Isopropyl alcohol and lint - free wipes are essential for cleaning the surfaces before installation to prevent contamination and ensure a proper seal.
- Tools: Depending on the device, you may need tools such as pliers or wrenches for a secure fit, but be careful not to over - tighten and damage the connectors.
Pre - installation Preparation
- Inspect the Connectors and Device: Carefully examine the rotating luer connectors and the device to ensure there are no visible defects, such as cracks, chips, or debris. Any damaged components should be discarded and replaced to avoid potential leaks or malfunctions.
- Clean the Surfaces: Use isopropyl alcohol and lint - free wipes to clean the mating surfaces of both the connectors and the device. This step is crucial to remove any dirt, grease, or contaminants that could interfere with the installation process or compromize the seal quality.
- Check Compatibility: Verify that the size and type of the rotating luer connectors are compatible with the device. Mismatched connectors can lead to leaks, improper fitting, and even safety hazards.
Installation Process
Step 1: Identify the Connection Points
Locate the areas on the device where the rotating luer connectors will be installed. These are usually clearly marked or designed to accommodate luer connectors. For example, on a syringe, the connection point is at the tip where the needle or tubing is attached.


Step 2: Prepare the Connectors
If the connectors have protective caps, remove them carefully. Make sure not to touch the mating surfaces with your fingers to prevent contamination.
Step 3: Align the Connectors
For a male - female luer connection, align the male luer lock connector with the female luer lock connector. The tapered tips should fit together smoothly, and the threads should align properly. It's important to approach the connection in a straight line to ensure a correct fit.
Step 4: Hand - Tighten the Connection
Gently screw the male luer into the female luer by hand. You should feel a slight resistance as the threads engage. Continue turning until the connectors are snug. Do not overtighten at this stage, as it may damage the threads or cause the connectors to crack.
Step 5: Check the Seal
After hand - tightening, check for any signs of leakage. You can do this by applying gentle pressure to the device or by running a small amount of fluid through the connection if it's a fluid - handling device. If you notice any leaks, try tightening the connection slightly more by hand.
Step 6: Final Tightening (if necessary)
If hand - tightening does not provide a secure enough seal, you may use tools such as pliers or wrenches. However, be extremely careful when using tools. Apply only enough force to achieve a proper seal, and avoid over - tightening, which can lead to damage.
Step 7: Test the Rotation
Once the connectors are securely installed, test the rotation feature. The rotating luer connector should be able to rotate freely without causing any loosening of the connection or leakage. This is an important aspect of the functionality of rotating luer connectors.
Troubleshooting
Even with careful installation, you may encounter some issues. Here are some common problems and solutions:
- Leakage: If there is a leak, first check if the connectors are properly aligned and tightened. If the problem persists, the connectors may be damaged, and you should replace them.
- Difficulty in Rotation: This could be due to debris or improper installation. Clean the connectors and check if the rotation improves. If not, inspect the connectors for any manufacturing defects.
- Thread Stripping: If the threads are stripped, the connectors will need to be replaced. Be careful when tightening the connectors to avoid this problem.
Importance of Proper Installation
Proper installation of rotating luer connectors is of utmost importance. In medical applications, a poorly installed connector can lead to significant health risks, such as the leakage of medications or the introduction of contaminants into the patient's body. In industrial fluid - handling systems, leaks can cause product loss, environmental pollution, and safety hazards. Therefore, following the correct installation procedures ensures the reliability and safety of the device.
Conclusion
Installing rotating luer connectors on a device requires careful attention to detail, from the pre - installation preparation to the final testing. As a supplier of these connectors, I hope this guide has provided you with valuable insights into the installation process. If you have any questions about our Rotating Luer Connectors or need assistance with the installation process, we are here to help. Feel free to reach out to us if you are interested in procurement and would like to discuss your specific requirements.
References
- Textbooks on medical device engineering
- Manufacturer's guidelines for rotating luer connectors